How to Paint a Rabbit with Acrylic: A Comprehensive Guide
Painting animals, especially beloved pets like rabbits, can be a rewarding artistic endeavor. This comprehensive guide will walk you through the process of how to paint a rabbit with acrylic paints, covering everything from preparing your canvas to adding the final details. Whether you’re a beginner or an experienced artist, this tutorial offers valuable insights into capturing the essence of these adorable creatures on canvas.
Understanding Acrylic Paints
Acrylic paints are a versatile and popular choice for artists due to their fast-drying nature, vibrant colors, and ease of use. They can be thinned with water or acrylic mediums, allowing for a wide range of techniques from washes to thick impasto applications. When learning how to paint a rabbit with acrylic, understanding these properties is crucial.
Choosing the Right Acrylics
Not all acrylic paints are created equal. Student-grade acrylics are more affordable but may lack the pigment concentration and lightfastness of professional-grade paints. Invest in artist-quality acrylics for the best results, especially if you plan to sell or display your artwork long-term. Essential colors for painting a rabbit include:
- Titanium White
- Burnt Umber
- Raw Sienna
- Payne’s Gray
- Ultramarine Blue
- Cadmium Yellow Light (optional)
- Alizarin Crimson (optional)
These colors can be mixed to create a wide range of natural tones and shades needed to realistically depict a rabbit’s fur and features. Experiment with mixing colors on your palette before applying them to the canvas.
Preparing Your Canvas
The canvas is the foundation of your painting. A well-prepared canvas will ensure that your acrylic paints adhere properly and that your artwork lasts for years to come. Here’s how to prepare your canvas before you learn how to paint a rabbit with acrylic.
Selecting the Right Canvas
Pre-stretched canvases are readily available in art supply stores in various sizes and textures. Choose a canvas size that suits your subject and skill level. A smaller canvas is generally easier to manage for beginners. Consider the texture of the canvas as well. A smoother canvas is ideal for detailed work, while a coarser canvas can add texture to your painting.
Priming the Canvas
Most pre-stretched canvases are already primed with gesso, a white acrylic primer that creates a smooth, absorbent surface for painting. However, adding an additional layer or two of gesso can further improve the canvas’s surface and prevent the paint from sinking into the fabric. Apply the gesso in thin, even layers, allowing each layer to dry completely before applying the next. Lightly sand the final layer of gesso for an ultra-smooth surface. This is a key step in how to paint a rabbit with acrylic and achieving a professional finish.
Sketching Your Rabbit
Before you start applying paint, it’s essential to create a detailed sketch of your rabbit on the canvas. This sketch will serve as a guide for your painting and help you accurately capture the rabbit’s proportions and features.
Using Reference Photos
Reference photos are invaluable when painting animals. Choose a high-quality photo of your rabbit that clearly shows its fur, features, and pose. Pay attention to the light and shadows in the photo, as these will help you create a realistic and three-dimensional painting. Having good references is essential when learning how to paint a rabbit with acrylic.
Transferring Your Sketch to the Canvas
There are several ways to transfer your sketch to the canvas. One method is to use a graphite transfer paper. Simply place the transfer paper between your sketch and the canvas, and trace over the lines of your sketch. Another method is to lightly draw the sketch directly onto the canvas with a pencil. Be sure to use a light touch so that the pencil lines don’t show through the paint.
Painting Techniques for Rabbit Fur
Rabbit fur is soft, fluffy, and full of subtle variations in color and texture. Capturing these qualities with acrylic paints requires patience and a few specific techniques. Mastering these techniques is crucial when learning how to paint a rabbit with acrylic.
Layering and Blending
Layering and blending are essential techniques for creating realistic fur. Start by applying a base layer of paint that closely matches the overall color of the rabbit’s fur. Then, gradually build up layers of lighter and darker colors to create depth and dimension. Use a soft brush to blend the edges of the layers together, creating a smooth transition between colors.
Dry Brushing
Dry brushing is a technique that involves using a dry brush with a small amount of paint to create a textured effect. This technique is perfect for creating the appearance of individual hairs in the rabbit’s fur. Load a dry brush with a small amount of paint and then wipe off most of the paint onto a paper towel. Lightly drag the brush across the canvas, allowing the bristles to catch on the texture of the canvas and create a broken, textured line. Using dry brushing effectively is important in how to paint a rabbit with acrylic.
Highlighting and Shading
Highlights and shadows are crucial for creating a three-dimensional effect. Observe your reference photo carefully and identify the areas where the light is hitting the rabbit’s fur and the areas that are in shadow. Use lighter colors to create highlights and darker colors to create shadows. Pay attention to the subtle variations in tone and color within the highlights and shadows to create a more realistic effect. Understanding light and shadow is important in how to paint a rabbit with acrylic successfully.
Painting the Rabbit’s Features
The rabbit’s eyes, nose, and ears are the focal points of the painting. Spend extra time and attention on these features to capture the rabbit’s personality and expression.
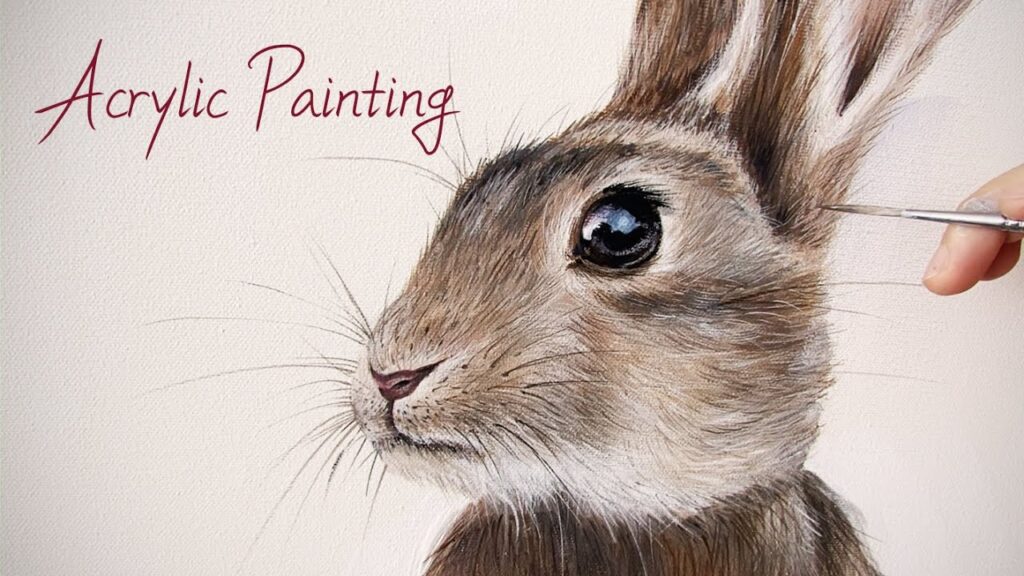
Painting the Eyes
The eyes are the windows to the soul, and this is especially true when painting animals. Pay close attention to the shape, color, and highlights in the rabbit’s eyes. Use a small brush to create the fine details, such as the pupil, iris, and highlights. Add a tiny dot of white paint to the corner of the eye to create a sparkle and bring the eye to life.
Painting the Nose
The rabbit’s nose is typically a soft, pink color. Use a small brush to paint the nose, paying attention to the shape and texture. Add subtle highlights and shadows to create a three-dimensional effect.
Painting the Ears
The rabbit’s ears are often covered in soft fur. Use the same techniques for painting fur to create the texture and appearance of the ears. Pay attention to the shape and angle of the ears, as these can greatly affect the rabbit’s expression.
Adding the Background
The background can play a significant role in the overall composition of your painting. Choose a background that complements the rabbit and doesn’t distract from the main subject. A simple, neutral background is often the best choice. You could consider a grassy meadow, a cozy indoor setting, or simply a blurred out background. When considering how to paint a rabbit with acrylic, the background is an important consideration.
Choosing a Background Color
Choose a background color that complements the colors in the rabbit’s fur. A cool-toned background, such as blue or green, can create a nice contrast with a warm-toned rabbit. A warm-toned background, such as brown or orange, can create a harmonious effect. Experiment with different colors to see what works best for your painting.
Applying the Background Paint
Apply the background paint in thin, even layers. Use a large brush to cover the entire canvas. Allow each layer to dry completely before applying the next. You can create a smooth, blended background or add texture with brushstrokes. The choice is yours.
Final Touches and Varnishing
Once you’re satisfied with your painting, it’s time to add the final touches. Step back and assess your work critically. Look for any areas that need improvement. Add any final highlights, shadows, or details. Consider this step when thinking about how to paint a rabbit with acrylic.
Varnishing Your Painting
Varnishing your painting will protect it from dust, dirt, and UV damage. It will also enhance the colors and create a more uniform sheen. Choose a varnish that is specifically designed for acrylic paints. Apply the varnish in thin, even layers, following the manufacturer’s instructions. Allow the varnish to dry completely before displaying your painting. This is the final step in how to paint a rabbit with acrylic and ensuring your artwork lasts.
Learning how to paint a rabbit with acrylic is a journey of practice and experimentation. Don’t be afraid to make mistakes and learn from them. With patience and dedication, you’ll be able to create beautiful and realistic paintings of these adorable creatures. Remember to practice regularly and experiment with different techniques to find what works best for you. Good luck, and happy painting!
Further reading: [See also: Acrylic Painting Techniques for Beginners], [See also: How to Choose the Right Paint Brushes], [See also: Creating Realistic Animal Portraits]

