How to Organize Garden Tools in Shed: A Practical Guide
A well-organized shed is a gardener’s best friend. It not only protects your valuable tools from the elements but also makes it easier to find what you need when you need it. Imagine stepping into your shed and instantly locating your pruning shears or your favorite trowel without having to sift through a jumbled mess. This guide provides practical tips and strategies on how to organize garden tools in shed effectively, transforming your cluttered space into an efficient and enjoyable gardening hub.
Why Organize Your Garden Shed?
Before diving into the how-to, let’s consider the why. A disorganized shed can lead to:
- Damaged Tools: Tools left on the floor or piled on top of each other are more likely to get damaged, rusted, or broken.
- Wasted Time: Searching for the right tool wastes valuable gardening time.
- Safety Hazards: Tripping over tools or accidentally bumping into sharp objects can lead to injuries.
- Reduced Lifespan of Tools: Exposure to moisture and improper storage shortens the lifespan of your gardening equipment.
By implementing a system to organize garden tools in shed, you’ll avoid these common pitfalls and create a more efficient and enjoyable gardening experience. The initial effort invested in organizing will pay dividends in the long run.
Step-by-Step Guide to Shed Organization
Here’s a comprehensive guide to help you organize garden tools in shed:
Step 1: The Great Purge
The first step is to remove everything from your shed. This allows you to assess what you have, identify duplicates, and get rid of items you no longer need or use. Be honest with yourself – if you haven’t used a tool in years, it’s probably time to let it go.
- Sort Items: As you remove items, sort them into categories: tools, gardening supplies, potting materials, and items to discard or donate.
- Dispose of Unwanted Items: Properly dispose of broken or unusable items. Consider donating usable tools to local charities or community gardens.
- Clean the Shed: Once the shed is empty, sweep or vacuum the floor and wipe down the walls and shelves. This is also a good time to check for any leaks or damage that needs to be addressed.
Step 2: Planning Your Layout
Now that you have a clean slate, it’s time to plan your shed layout. Consider the size and shape of your shed and the types of tools you need to store. Think about creating zones for different types of items.
- Identify Zones: Designate specific areas for long-handled tools, hand tools, gardening supplies, and potting materials.
- Consider Vertical Space: Make the most of vertical space by using shelves, hooks, and wall-mounted organizers.
- Plan for Accessibility: Arrange tools so that frequently used items are easily accessible.
Step 3: Implementing Storage Solutions
This is where you’ll put your plan into action and implement storage solutions to organize garden tools in shed.
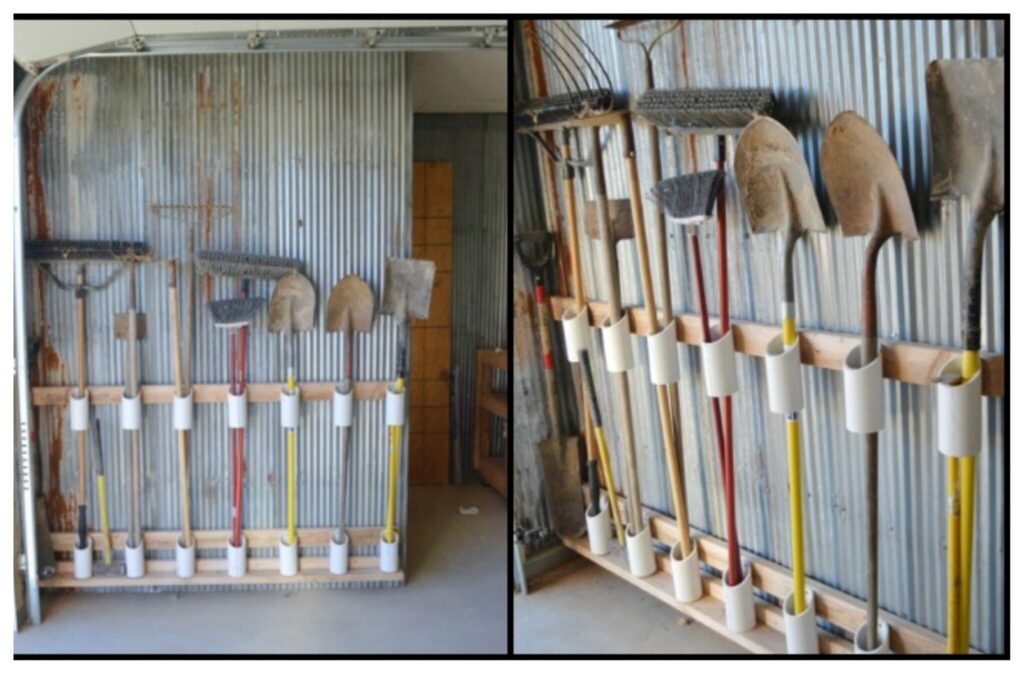
Long-Handled Tools
These tools, such as shovels, rakes, and hoes, can take up a lot of space if not stored properly.
- Wall-Mounted Racks: Install wall-mounted racks or tool holders to keep long-handled tools off the floor.
- DIY Solutions: Create your own storage rack by attaching PVC pipes to a wooden board and mounting it on the wall.
- Bungee Cords: Use bungee cords to secure tools against the wall, preventing them from falling over.
Hand Tools
Hand tools, such as trowels, pruning shears, and hand forks, can be stored in a variety of ways.
- Pegboards: Pegboards are a versatile storage solution for hand tools. Use hooks to hang tools of various sizes and shapes.
- Magnetic Tool Strips: Magnetic tool strips are perfect for storing metal hand tools. They keep tools within easy reach and prevent them from getting lost in a drawer.
- Toolboxes: Use toolboxes or storage bins to organize smaller hand tools.
Gardening Supplies
Gardening supplies, such as fertilizers, pesticides, and seeds, should be stored in a safe and organized manner.
- Shelves: Install shelves to store gardening supplies off the floor.
- Storage Bins: Use storage bins to organize smaller items, such as seeds, gloves, and plant markers.
- Label Everything: Label all containers and shelves so you can easily find what you need.
Potting Materials
Potting soil, compost, and other potting materials should be stored in a dry and accessible location.
- Large Containers: Store potting soil and compost in large, airtight containers to prevent moisture from getting in.
- Designated Area: Create a designated area for potting materials to keep them separate from other items.
Step 4: Maintaining Your Organized Shed
Once you’ve organized your shed, it’s important to maintain the organization to prevent it from becoming cluttered again.
- Put Tools Away After Use: Make it a habit to put tools away after each use.
- Regularly Declutter: Take a few minutes each month to declutter your shed and remove any items you no longer need.
- Sweep Regularly: Sweep the floor regularly to keep it clean and free of debris.
Creative Storage Ideas to Organize Garden Tools in Shed
Looking for more inspiration? Here are some creative storage ideas to organize garden tools in shed:
- Repurpose Old Pallets: Use old pallets to create a vertical garden tool organizer.
- DIY Rolling Cart: Build a rolling cart to store potting supplies and tools that you can easily move around.
- Hanging Shoe Organizer: Use a hanging shoe organizer to store small hand tools and gardening gloves.
Safety Considerations
When organizing your shed, it’s important to prioritize safety.
- Store Sharp Tools Safely: Store sharp tools, such as pruning shears and knives, in a safe place where they won’t be accidentally bumped into.
- Keep Chemicals Out of Reach: Store chemicals, such as fertilizers and pesticides, out of reach of children and pets.
- Wear Gloves: Wear gloves when handling gardening supplies and tools to protect your hands.
Benefits of an Organized Shed
The benefits of taking the time to organize garden tools in shed are numerous. You will save time, reduce stress, and prolong the life of your tools. A well-organized shed is a pleasure to work in and makes gardening a more enjoyable experience.
Conclusion
Organizing your garden shed may seem like a daunting task, but with a little planning and effort, you can transform your cluttered space into an efficient and enjoyable gardening hub. By following the steps outlined in this guide, you can organize garden tools in shed effectively and create a space that you’ll love to work in. Remember to declutter regularly, implement creative storage solutions, and prioritize safety. A well-organized shed will not only make gardening easier but also more enjoyable, allowing you to focus on what you love most – nurturing your garden and enjoying the fruits (and vegetables) of your labor. Now that you know how to organize garden tools in shed, get started today and enjoy the benefits of a clutter-free gardening space!
[See also: Garden Tool Maintenance Tips] [See also: Shed Building Basics]

