How to Henna Tattoo at Home: A Comprehensive Guide
Henna tattoos, also known as mehndi, have been a form of body art for centuries, deeply rooted in cultural traditions across South Asia, the Middle East, and Africa. The temporary skin decoration, created using a paste made from the henna plant, is often associated with celebrations like weddings and festivals. For those looking to explore this art form, learning how to henna tattoo at home offers a creative and personal outlet. This guide provides a step-by-step approach to safely and effectively creating beautiful henna designs in the comfort of your own home.
Understanding Henna and Its Safety
Before diving into the process of how to henna tattoo at home, it’s crucial to understand the nature of henna and potential safety concerns. Natural henna, derived from the Lawsonia inermis plant, produces a reddish-brown stain. It’s essential to use only natural henna for skin application. Black henna, which often contains a chemical dye called paraphenylenediamine (PPD), can cause severe allergic reactions, permanent scarring, and long-term health problems. Always ensure the henna powder or paste you use is 100% natural and free from PPD.
Identifying Natural Henna
- Color: Natural henna powder is typically green-brown.
- Scent: It has an earthy, slightly herbal aroma.
- Stain: The stain will be reddish-brown, not black.
Gathering Your Supplies
To successfully henna tattoo at home, you’ll need to assemble the following materials:
- Henna Powder: Opt for high-quality, finely sifted henna powder.
- Lemon Juice: This helps release the dye from the henna.
- Sugar: Adds pliability to the paste.
- Essential Oils: Lavender, tea tree, or cajeput oil enhance the stain and provide a pleasant aroma.
- Mixing Bowl and Spoon: For preparing the henna paste.
- Applicator Bottles or Cones: These allow for precise application of the henna.
- Design Stencils (Optional): Useful for beginners or intricate designs.
- Cotton Balls or Swabs: For cleaning up mistakes.
- Medical Tape: To secure the design and keep the paste moist.
Preparing the Henna Paste
The consistency of the henna paste is crucial for a successful henna tattoo at home. Follow these steps to create the perfect paste:
- Sift the Henna Powder: Use a fine-mesh sieve to remove any clumps.
- Mix with Lemon Juice: Gradually add lemon juice to the henna powder, mixing until you achieve a thick, mashed-potato-like consistency. Start with a small amount of lemon juice and add more as needed.
- Add Sugar and Essential Oils: Mix in a teaspoon of sugar and a few drops of your chosen essential oil. The sugar makes the paste smoother and more pliable, while the essential oils enhance the dye release and provide a pleasant scent.
- Let It Rest: Cover the bowl with plastic wrap and let the paste sit at room temperature for at least 4-6 hours, or preferably overnight. This allows the dye to release fully.
- Check the Consistency: Before use, check the paste’s consistency. It should be smooth, creamy, and easily flowable without being too runny. If it’s too thick, add a few more drops of lemon juice. If it’s too thin, add a little more henna powder.
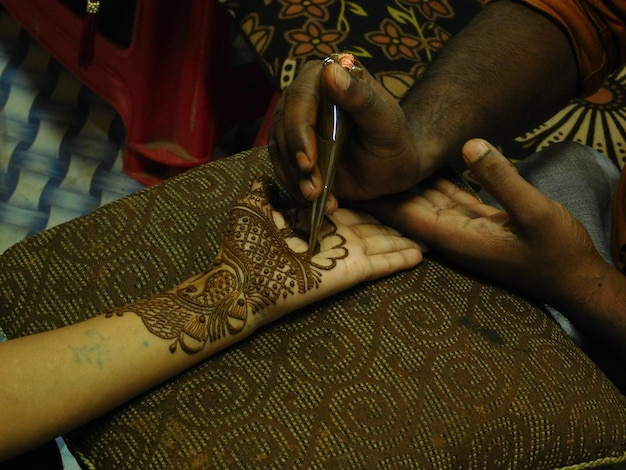
Applying the Henna
Now that you’ve prepared your henna paste, it’s time to learn how to henna tattoo at home. Follow these steps for application:
- Prepare the Skin: Clean the area where you’ll be applying the henna with soap and water. Exfoliate gently to remove any dead skin cells. Avoid applying lotions or oils to the area, as these can create a barrier and prevent the henna from staining properly.
- Fill the Applicator: Carefully fill your applicator bottle or cone with the prepared henna paste. Ensure there are no air bubbles to prevent uneven application.
- Apply the Design: If using a stencil, apply it to your skin. If freehanding, carefully draw your design onto your skin using the applicator. Apply steady, even pressure to create clean lines. Remember, practice makes perfect, so start with simple designs if you’re a beginner.
- Correct Mistakes: Use a cotton swab dipped in water to immediately correct any mistakes.
- Let It Dry: Allow the henna paste to dry completely. This can take anywhere from 30 minutes to an hour. The drier the paste, the darker the stain will be.
- Seal the Design (Optional): To keep the paste moist and in contact with the skin for longer, you can seal the design with medical tape or a mixture of lemon juice and sugar.
Aftercare for a Darker Stain
Proper aftercare is crucial for achieving a dark, long-lasting henna tattoo at home. Follow these tips:
- Keep the Paste On: The longer the paste stays on your skin, the darker the stain will be. Aim to keep it on for at least 2-6 hours, or even overnight if possible.
- Avoid Water: After removing the paste, avoid washing the area with soap and water for at least 12-24 hours. Water can hinder the oxidation process and lighten the stain.
- Apply Natural Oils: Regularly apply natural oils like coconut oil, olive oil, or shea butter to the hennaed area. This helps to keep the skin moisturized and protects the stain.
- Avoid Excessive Sweating: Excessive sweating can cause the stain to fade more quickly. Try to avoid activities that cause you to sweat heavily, especially in the first few days after application.
- Avoid Harsh Chemicals: Avoid using harsh chemicals, such as chlorine or strong detergents, on the hennaed area. These can strip the stain and cause it to fade prematurely.
Common Mistakes to Avoid
When learning how to henna tattoo at home, it’s helpful to be aware of common mistakes to avoid:
- Using Black Henna: As mentioned earlier, black henna can cause severe allergic reactions and permanent scarring. Always use natural henna.
- Improper Paste Consistency: A paste that is too thick or too thin will not apply evenly and can result in a poor stain.
- Insufficient Dye Release: Allowing the henna paste to sit for the recommended time is crucial for proper dye release.
- Inadequate Aftercare: Proper aftercare is essential for achieving a dark, long-lasting stain.
- Applying to Oily Skin: Oily skin can prevent the henna from staining properly. Always clean and exfoliate the skin before application.
Design Ideas and Inspiration
If you’re looking for design ideas for your henna tattoo at home, there are countless resources available online. Consider these options:
- Traditional Patterns: Explore traditional mehndi designs from different cultures, such as Indian, Arabic, and African patterns.
- Floral Motifs: Floral designs are a popular choice for henna tattoos.
- Geometric Shapes: Geometric patterns can create a modern and stylish look.
- Personalized Designs: Incorporate personal symbols, initials, or meaningful images into your design.
Remember to start with simple designs and gradually work your way up to more complex patterns as you gain experience. [See also: Henna Design Inspiration for Beginners]
Troubleshooting Common Issues
Even with careful preparation and application, you may encounter some issues when you henna tattoo at home. Here are some common problems and their solutions:
- Light Stain: This can be caused by insufficient dye release, inadequate aftercare, or applying to oily skin. Ensure you allow the henna paste to sit for the recommended time, follow proper aftercare procedures, and clean the skin thoroughly before application.
- Uneven Stain: This can be caused by an inconsistent paste consistency or uneven application. Ensure your paste is smooth and creamy, and apply even pressure when using the applicator.
- Allergic Reaction: If you experience itching, redness, or swelling after applying henna, discontinue use immediately and consult a doctor.
Conclusion
Learning how to henna tattoo at home can be a rewarding and creative experience. By following the steps outlined in this guide, using natural henna, and practicing proper aftercare, you can create beautiful and temporary body art that celebrates cultural traditions and personal expression. Remember to prioritize safety and always test a small area of skin before applying henna extensively. With patience and practice, you’ll be creating stunning henna designs in no time. The art of henna is a beautiful way to adorn the body and connect with ancient traditions. Enjoy the process and the beautiful results!

