Achieving Crystal Clarity: A Comprehensive Guide to Acrylic Clear Varnish
In the realm of art, crafts, and DIY projects, the final flourish often lies in the application of a protective and aesthetically pleasing varnish. Among the myriad options available, acrylic clear varnish stands out as a versatile and reliable choice. This comprehensive guide delves into the world of acrylic clear varnish, exploring its properties, applications, benefits, and how to achieve a flawless finish. Whether you’re a seasoned artist, a hobbyist, or simply looking to safeguard your creations, understanding the nuances of acrylic clear varnish is crucial.
What is Acrylic Clear Varnish?
Acrylic clear varnish is a transparent coating formulated with acrylic polymers. These polymers, suspended in a liquid medium, create a durable and protective layer when applied to a surface. The “clear” aspect of the varnish ensures that the underlying colors and details of the artwork or project remain visible and uncompromised. Unlike some other varnishes that can yellow or alter the appearance of the substrate over time, acrylic clear varnish is designed to maintain the original aesthetic.
Composition and Properties
- Acrylic Polymers: The primary component, providing the film-forming properties and durability.
- Solvents: Used to dissolve and carry the polymers, allowing for easy application. These can be water-based or solvent-based, influencing drying time and cleanup.
- Additives: May include UV absorbers to protect against fading, leveling agents for a smooth finish, and defoamers to prevent bubbles.
Key properties of acrylic clear varnish include:
- Clarity: Offers excellent transparency, preserving the original colors and details.
- Durability: Provides a tough, protective layer that resists scratches, abrasions, and moisture.
- Flexibility: Remains flexible even after drying, minimizing the risk of cracking or peeling.
- UV Resistance: Many formulations offer UV protection, preventing fading and yellowing.
- Water Resistance: Protects against water damage and humidity.
- Adhesion: Bonds well to a variety of surfaces, including canvas, wood, paper, and metal.
Applications of Acrylic Clear Varnish
The versatility of acrylic clear varnish makes it suitable for a wide range of applications:
- Paintings: Protecting acrylic and oil paintings from dust, dirt, and UV damage.
- Crafts: Sealing and protecting craft projects made from wood, paper, fabric, or other materials.
- Furniture: Adding a protective layer to furniture, enhancing its durability and appearance.
- Photographs: Preserving and protecting photographs from fading and damage.
- Decoupage: Sealing and protecting decoupage projects.
- Mixed Media Art: Integrating various materials and textures, providing a unified and protective finish.
Specific Use Cases
Let’s explore some specific examples:
- Protecting Acrylic Paintings: Acrylic clear varnish is essential for protecting acrylic paintings from environmental factors. It prevents dust and dirt from embedding in the surface and shields the colors from fading due to UV exposure.
- Enhancing Wood Crafts: Applying acrylic clear varnish to wood crafts not only protects the wood but also enhances its natural grain and color. It creates a smooth, professional finish that is resistant to scratches and moisture.
- Preserving Photographs: Photographs can fade and deteriorate over time. Applying a layer of acrylic clear varnish can help protect them from UV damage and moisture, extending their lifespan.
Benefits of Using Acrylic Clear Varnish
Choosing acrylic clear varnish offers several advantages over other types of varnishes:
- Non-Yellowing: Unlike some varnishes that can yellow over time, acrylic clear varnish remains clear, preserving the original colors of the artwork.
- Flexibility: It remains flexible even after drying, reducing the risk of cracking or peeling, especially on flexible surfaces like canvas.
- Easy to Apply: Acrylic clear varnish is easy to apply with a brush, roller, or spray gun.
- Fast Drying: It typically dries quickly, allowing for multiple coats to be applied in a relatively short amount of time.
- Water-Based Options: Water-based acrylic clear varnish is low in VOCs (volatile organic compounds), making it a safer and more environmentally friendly choice.
- Easy Cleanup: Water-based formulations can be easily cleaned up with soap and water.
Types of Acrylic Clear Varnish
Acrylic clear varnish is available in various formulations, each with its own characteristics:
- Water-Based Acrylic Varnish: This type is environmentally friendly, low in VOCs, and easy to clean up. It dries quickly and is suitable for a wide range of surfaces.
- Solvent-Based Acrylic Varnish: Solvent-based varnishes offer excellent durability and water resistance. They are ideal for projects that require a tough and long-lasting finish. However, they have higher VOC content and require proper ventilation during application.
- Spray Acrylic Varnish: Available in aerosol cans, spray varnishes provide a convenient and even application. They are ideal for intricate projects or when a smooth, brushstroke-free finish is desired.
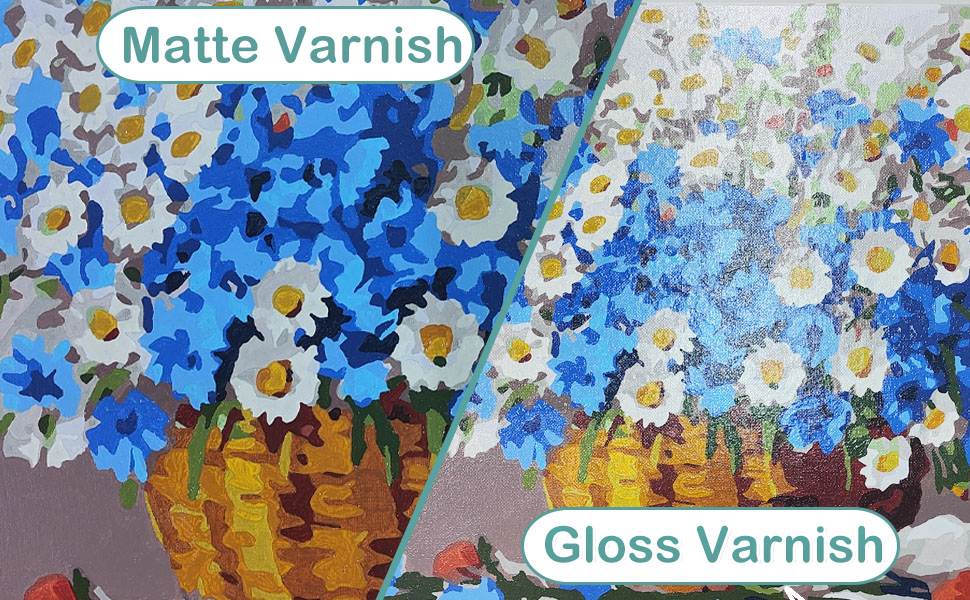
- Matte Acrylic Varnish: Provides a non-reflective, matte finish, reducing glare and creating a subtle, elegant look.
- Gloss Acrylic Varnish: Creates a high-shine, glossy finish, enhancing the colors and details of the artwork.
- Satin Acrylic Varnish: Offers a balance between matte and gloss, providing a subtle sheen without being overly reflective.
How to Apply Acrylic Clear Varnish for a Flawless Finish
Achieving a flawless finish with acrylic clear varnish requires careful preparation and application:
Preparation
- Clean the Surface: Ensure the surface is clean, dry, and free from dust, dirt, and grease. Use a soft cloth or tack cloth to remove any debris.
- Sand if Necessary: If the surface is rough or uneven, sand it lightly with fine-grit sandpaper to create a smooth base.
- Test the Varnish: Before applying the varnish to the entire project, test it on a small, inconspicuous area to ensure compatibility and desired finish.
- Work in a Well-Ventilated Area: If using solvent-based varnish, work in a well-ventilated area to avoid inhaling harmful fumes.
- Gather Your Supplies: Have all your supplies ready, including the varnish, brushes, rollers, or spray gun, as well as clean cloths and a mixing container (if necessary).
Application Techniques
- Brushing: Use a high-quality brush designed for varnish application. Apply the varnish in smooth, even strokes, following the grain of the wood or the contours of the artwork. Avoid applying too much varnish at once, as this can lead to drips and runs.
- Rolling: Use a foam roller for a smooth, even application, especially on large surfaces. Apply the varnish in thin coats, overlapping each stroke slightly.
- Spraying: Use a spray gun or aerosol can for a fine, even application. Hold the spray gun or can at a consistent distance from the surface and move it in smooth, overlapping strokes.
Drying and Curing
- Allow Sufficient Drying Time: Allow the varnish to dry completely between coats. Follow the manufacturer’s instructions for drying times, as they can vary depending on the type of varnish and environmental conditions.
- Apply Multiple Coats: Apply multiple thin coats of varnish rather than one thick coat. This will result in a smoother, more durable finish.
- Curing Time: After the final coat has dried, allow the varnish to cure completely before handling or using the project. Curing times can range from several days to several weeks, depending on the type of varnish.
Troubleshooting Common Issues
Even with careful preparation and application, some issues may arise when using acrylic clear varnish:
- Bubbles: Bubbles can form if the varnish is shaken vigorously or if it is applied too thickly. To prevent bubbles, avoid shaking the varnish and apply it in thin coats. If bubbles do appear, try gently brushing them out or using a heat gun to pop them.
- Brush Marks: Brush marks can occur if the varnish is too thick or if the brush is not clean. To avoid brush marks, thin the varnish slightly with the appropriate solvent and use a high-quality brush.
- Runs and Drips: Runs and drips can occur if the varnish is applied too thickly. To prevent runs and drips, apply the varnish in thin coats and avoid applying too much at once.
- Cloudiness: Cloudiness can occur if the varnish is applied in humid conditions or if the surface is not properly cleaned. To avoid cloudiness, apply the varnish in a dry environment and ensure the surface is clean and dry.
- Tackiness: If the varnish remains tacky even after drying, it may be due to insufficient drying time or improper mixing. Ensure the varnish is allowed to dry completely and that it is mixed thoroughly before application.
Safety Precautions
When working with acrylic clear varnish, it is essential to follow safety precautions:
- Ventilation: Work in a well-ventilated area, especially when using solvent-based varnishes.
- Protective Gear: Wear gloves and eye protection to prevent skin and eye irritation.
- Respiratory Protection: Use a respirator or mask when spraying varnish to avoid inhaling harmful fumes.
- Storage: Store varnish in a cool, dry place away from heat and flames.
- Disposal: Dispose of varnish and cleaning materials properly according to local regulations.
In conclusion, acrylic clear varnish is an invaluable tool for artists, crafters, and DIY enthusiasts. Its clarity, durability, and ease of application make it an excellent choice for protecting and enhancing a wide range of projects. By understanding its properties, applications, and proper application techniques, you can achieve a flawless finish that will stand the test of time. Remember to always prioritize safety and follow the manufacturer’s instructions for the best results. Consider experimenting with different types of acrylic clear varnish to find the perfect finish for your next masterpiece. [See also: Choosing the Right Varnish for Your Art Project] Understanding the nuances of different varnishes can significantly impact the final appearance and longevity of your work.

