Effortless Elegance: Exploring Easy Henna Foot Designs for Every Occasion
Henna, a natural dye derived from the henna plant, has been used for centuries as a form of body art, particularly in South Asia, the Middle East, and Africa. While intricate and elaborate henna designs are undoubtedly stunning, many individuals seek simpler, more accessible options. This article delves into the world of easy henna foot designs, offering inspiration and guidance for creating beautiful and manageable patterns. Whether you’re a beginner or simply prefer minimalist aesthetics, you’ll discover a range of options to adorn your feet with henna’s timeless allure. We’ll explore different design elements, application techniques, and aftercare tips to ensure a flawless and long-lasting result. The beauty of easy henna foot designs lies in their adaptability; they can be customized to reflect personal style and preferences.
The Allure of Henna Foot Art
The practice of applying henna to the skin holds deep cultural significance. Often associated with celebrations like weddings and festivals, henna symbolizes good luck, prosperity, and joy. Beyond its symbolic meaning, henna also serves as a form of self-expression and adornment. The feet, in particular, provide a unique canvas for showcasing artistic flair. Easy henna foot designs allow individuals to participate in this tradition without feeling overwhelmed by complexity.
Simple Yet Stunning: Design Inspirations
When it comes to easy henna foot designs, the possibilities are endless. Here are a few ideas to get you started:
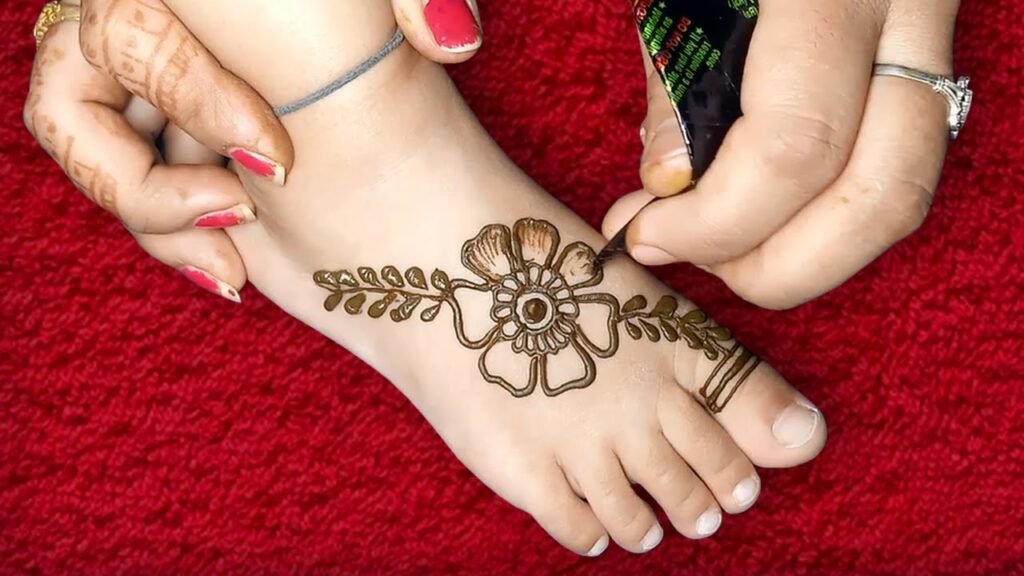
- Floral Motifs: Flowers are a classic choice for henna designs. Simple floral patterns, such as daisies, roses, or lotus flowers, can be easily adapted for the feet. Consider creating a single focal point flower on the top of the foot or scattering smaller blooms across the toes.
- Geometric Patterns: Geometric designs offer a modern and minimalist aesthetic. Straight lines, triangles, circles, and squares can be combined to create visually appealing patterns. These designs are particularly well-suited for individuals who prefer a more structured and symmetrical look.
- Vine and Leaf Patterns: Delicate vines and leaves can be elegantly draped across the foot, creating a natural and flowing design. These patterns are particularly flattering and can be easily customized to follow the contours of the foot.
- Dot Work: Simple dots can be used to create intricate and textured designs. Dot work is an excellent option for beginners as it requires minimal skill and can be easily corrected.
- Paisley Patterns: Paisley, also known as the mango motif, is a traditional henna design element. A single paisley or a series of smaller paisleys can be incorporated into easy henna foot designs.
Essential Tools and Materials
Before you begin applying henna, it’s essential to gather the necessary tools and materials:
- Henna Paste: Opt for high-quality, pre-made henna paste or prepare your own using henna powder, lemon juice, and essential oils. Ensure the paste is smooth and free of lumps.
- Applicator: Choose an applicator that suits your skill level and design preferences. Options include henna cones, applicator bottles, or even toothpicks for creating fine details.
- Stencils (Optional): Stencils can be helpful for creating precise and symmetrical designs, especially for beginners.
- Lemon Juice and Sugar Mixture: This mixture helps to keep the henna paste moist and allows for better dye release.
- Cotton Balls or Tissues: Use these to clean up any mistakes or excess henna paste.
- Eucalyptus or Lavender Oil: Applying a small amount of essential oil to the skin before applying henna can enhance the staining process.
Step-by-Step Guide to Applying Easy Henna Foot Designs
- Prepare the Skin: Thoroughly wash and dry your feet. Exfoliate gently to remove any dead skin cells. Apply a small amount of eucalyptus or lavender oil to the area where you’ll be applying henna.
- Plan Your Design: Sketch out your design on paper or use a stencil as a guide. This will help you visualize the final result and avoid mistakes.
- Apply the Henna Paste: Carefully apply the henna paste to your skin using your chosen applicator. If using a cone, apply gentle pressure to create a smooth and even line. For stencils, apply the paste over the stencil and carefully remove it.
- Allow the Henna to Dry: Let the henna paste dry completely. This may take anywhere from 30 minutes to a few hours, depending on the humidity and temperature. Apply the lemon juice and sugar mixture to keep the paste moist.
- Remove the Henna Paste: Once the henna paste is dry, gently scrape it off. Avoid washing the area with water for at least two hours.
- Apply Aftercare: After removing the henna paste, apply a natural oil, such as coconut oil or olive oil, to moisturize the skin. Avoid using harsh soaps or detergents on the area for the first few days.
Tips for Achieving a Long-Lasting Stain
To ensure a vibrant and long-lasting henna stain, follow these tips:
- Use High-Quality Henna Paste: The quality of the henna paste directly affects the intensity and longevity of the stain.
- Keep the Paste Moist: Applying the lemon juice and sugar mixture helps to keep the paste moist and allows for better dye release.
- Avoid Washing the Area: Water can hinder the staining process. Avoid washing the area with water for at least two hours after removing the henna paste.
- Moisturize Regularly: Keeping the skin moisturized helps to prolong the life of the henna stain.
- Avoid Exfoliating: Exfoliating the skin can fade the henna stain. Avoid exfoliating the area where you have applied henna.
Troubleshooting Common Henna Application Issues
Even with careful planning and execution, you may encounter some common issues during henna application. Here’s how to troubleshoot them:
- Faded Stain: A faded stain can be caused by using low-quality henna paste, not keeping the paste moist, or washing the area too soon after application.
- Uneven Application: Uneven application can be caused by inconsistent pressure or using a faulty applicator.
- Smudging: Smudging can be caused by accidentally touching the henna paste while it’s still wet.
- Allergic Reaction: Although rare, some individuals may experience an allergic reaction to henna. If you experience itching, redness, or swelling, discontinue use immediately and consult a doctor. (Note: Black henna is particularly dangerous and should be avoided as it contains chemical dyes that can cause severe skin reactions.)
Beyond the Basics: Elevating Your Easy Henna Foot Designs
Once you’ve mastered the basics of easy henna foot designs, you can start experimenting with more advanced techniques and design elements. Consider incorporating:
- Glitter Accents: Adding glitter to your henna designs can create a sparkling and festive effect.
- Gemstones: Small gemstones can be strategically placed on your henna designs to add a touch of glamour.
- White Henna: White henna is a temporary body paint that can be used to create contrasting designs alongside traditional henna.
- Combining Designs: Mix and match different design elements to create unique and personalized patterns.
The Enduring Appeal of Henna Art
Henna art continues to captivate and inspire individuals around the world. Its rich history, cultural significance, and artistic versatility make it a timeless form of self-expression. Easy henna foot designs offer a accessible way to embrace this ancient tradition and adorn your feet with beauty and meaning. Whether you’re preparing for a special occasion or simply seeking a creative outlet, henna provides a unique and enchanting way to connect with your inner artist. The ease and simplicity of these designs makes them perfect for anyone looking to add a touch of elegance to their everyday life. With practice and experimentation, you can create stunning easy henna foot designs that reflect your personal style and celebrate the beauty of henna art. Remember to always use high-quality henna paste and prioritize skin safety to ensure a positive and enjoyable experience. [See also: Henna Stain Aftercare Tips] The world of easy henna foot designs awaits – embrace the artistry and let your creativity flow!

