How to Paint Bricks on Canvas with Acrylics: A Comprehensive Guide
Painting bricks on canvas using acrylics can be a rewarding artistic endeavor. Whether you’re aiming for a realistic depiction of a brick wall or an abstract interpretation, understanding the techniques and materials involved is crucial. This guide will walk you through the process, from preparing your canvas to adding the final touches, ensuring you create a visually compelling piece. This article will explain exactly how to paint bricks on canvas with acrylics.
Materials You’ll Need
- Canvas: Choose a canvas size that suits your project. Stretched canvas is ideal for acrylic painting.
- Acrylic Paints: A variety of brick-like colors such as burnt umber, raw sienna, red oxide, and white. Black and grey can also be useful for shadows and highlights.
- Brushes: A selection of brushes, including a large flat brush for base coats, a medium-sized brush for details, and a small, fine brush for outlining.
- Palette: A palette for mixing your paints. A disposable palette or a wet palette can be very useful.
- Water Container: To clean your brushes.
- Palette Knife or Spatula: For creating texture and applying paint in a thick, impasto style.
- Ruler or Tape: To help create straight lines for the bricks.
- Pencil: For sketching the brick pattern.
- Eraser: To correct any mistakes in your sketch.
- Acrylic Mediums (Optional): Glazing medium, retarder, or texture gel can enhance your painting.
Preparing Your Canvas
Before you start painting, it’s essential to prepare your canvas properly. This ensures the paint adheres well and the final result is professional.
Priming the Canvas
Most canvases come pre-primed, but adding an extra layer of gesso can improve the surface. Gesso provides a slightly textured surface that helps the acrylic paint adhere better. Apply a thin, even coat of gesso using a large flat brush. Let it dry completely before moving on to the next step. You may want to apply two coats for optimal results. This step is crucial when you want to paint bricks on canvas with acrylics because proper adhesion ensures the longevity of your artwork.
Sketching the Brick Pattern
Use a pencil and ruler to sketch the brick pattern onto the canvas. Decide on the size and arrangement of the bricks. A common brick pattern is the running bond, where each row is offset by half a brick. Lightly sketch the outlines of the bricks, ensuring they are evenly spaced. Remember, this is just a guide, so don’t worry about making it perfect. The imperfections will add character to the final painting. When learning how to paint bricks on canvas with acrylics, a well-defined sketch is half the battle.
Painting the Base Coat
The base coat sets the foundation for your brick painting. Choose a color that will serve as the overall tone of the bricks. A mixture of burnt umber and raw sienna often works well. Mix your chosen colors on the palette until you achieve the desired hue.
Applying the Base Coat
Using a large flat brush, apply an even layer of the base coat to the entire canvas, covering the sketched brick pattern. Ensure the paint is applied smoothly and consistently. Let the base coat dry completely before proceeding to the next step. This usually takes about 20-30 minutes, depending on the thickness of the paint and the ambient temperature. Applying the base coat uniformly is a key step when you paint bricks on canvas with acrylics.
Adding Color Variations
To create a realistic brick effect, it’s important to add color variations to each brick. This involves mixing different shades of the base color and applying them to individual bricks.
Mixing Color Variations
On your palette, mix small amounts of white, black, or red oxide with your base color. This will create lighter, darker, and warmer tones. For example, adding a touch of white will create a lighter brick, while adding a touch of black will create a darker brick. Experiment with different combinations until you have a range of colors that resemble natural brick variations. It’s these subtle variations that will make your painting more realistic when you paint bricks on canvas with acrylics.
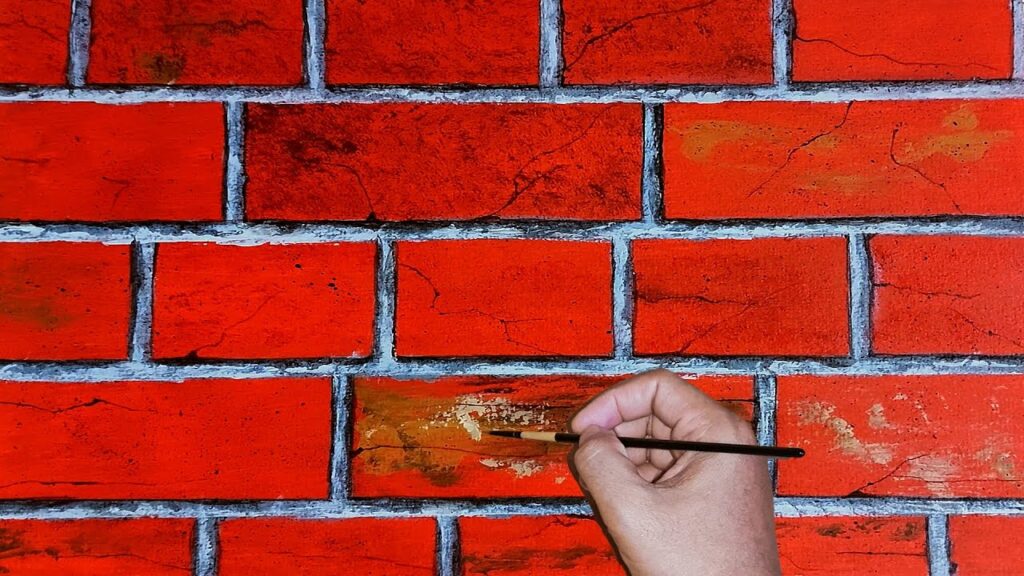
Applying Color Variations to Individual Bricks
Using a medium-sized brush, carefully paint each brick with a different color variation. Alternate between the lighter, darker, and warmer tones to create a random pattern. Don’t be afraid to blend the colors slightly to soften the edges. This will create a more natural and organic look. Remember, real bricks have imperfections and variations in color, so embrace the randomness. This step is what truly brings the bricks to life when you paint bricks on canvas with acrylics.
Creating Texture
Texture is a crucial element in creating a realistic brick effect. There are several ways to add texture to your painting, including using a palette knife, dry brushing, or texture gel.
Using a Palette Knife
A palette knife can be used to apply paint in a thick, impasto style, creating a raised texture that mimics the rough surface of bricks. Load a small amount of paint onto the palette knife and apply it to the canvas in short, choppy strokes. Vary the direction and pressure of the strokes to create a random texture. This technique is particularly effective for highlighting the edges of the bricks and adding depth to the painting. Learning to use a palette knife enhances the realism when you paint bricks on canvas with acrylics.
Dry Brushing
Dry brushing involves using a dry brush with a small amount of paint to create a textured effect. Dip the tip of a dry brush into the paint and then wipe off most of the paint onto a paper towel. Lightly drag the brush across the canvas, allowing the bristles to catch on the surface and create a speckled texture. This technique is ideal for adding subtle texture to the bricks and softening the edges. Dry brushing is a great way to add subtle texture when you paint bricks on canvas with acrylics.
Using Texture Gel
Acrylic texture gel can be mixed with your paints to create a thicker, more textured consistency. Apply the texture gel to the canvas before painting, or mix it directly with your acrylic paints. This will add a three-dimensional effect to the bricks, making them appear more realistic. Texture gel is a versatile tool for adding depth when you paint bricks on canvas with acrylics.
Adding Mortar Lines
The mortar lines between the bricks are an essential part of the brick pattern. They define the shape and arrangement of the bricks and add contrast to the painting.
Mixing the Mortar Color
Mix a light grey color for the mortar. A combination of white and a small amount of black usually works well. You can also add a touch of raw umber to warm up the grey. The mortar color should be lighter than the bricks to create contrast. Getting the right mortar color is crucial when you paint bricks on canvas with acrylics, as it defines the bricks.
Painting the Mortar Lines
Using a small, fine brush, carefully paint the mortar lines between the bricks. Ensure the lines are straight and evenly spaced. You can use a ruler or tape to guide your brush and create clean lines. If you accidentally paint over the bricks, use a damp brush to wipe away the excess paint. Pay close attention to detail when painting the mortar lines, as they can significantly impact the overall appearance of the painting. Clean, crisp mortar lines are essential to a realistic result when you paint bricks on canvas with acrylics.
Adding Shadows and Highlights
Shadows and highlights add depth and dimension to the painting, making the bricks appear more three-dimensional. Observe a real brick wall and note where the shadows and highlights fall.
Identifying Shadow and Highlight Areas
Determine the direction of the light source and identify the areas that would be in shadow and the areas that would be highlighted. Typically, the top and front of the bricks will be highlighted, while the bottom and sides will be in shadow. Understanding light and shadow is vital when you paint bricks on canvas with acrylics.
Applying Shadows and Highlights
Using a small brush, apply darker shades of the brick color to the shadow areas and lighter shades to the highlight areas. Blend the shadows and highlights seamlessly into the surrounding colors to create a smooth transition. Pay attention to the intensity of the shadows and highlights, adjusting them as needed to create a realistic effect. Subtle shading brings depth when you paint bricks on canvas with acrylics.
Final Touches and Sealing
Once you’re satisfied with the painting, add any final touches and seal the canvas to protect the artwork.
Adding Final Details
Inspect the painting closely and add any final details that may be needed. This could include adding more texture, adjusting the colors, or refining the mortar lines. Step back from the painting and view it from a distance to get a fresh perspective. Small details can make a big difference when you paint bricks on canvas with acrylics.
Sealing the Canvas
To protect the acrylic painting from dust, dirt, and UV damage, seal the canvas with a layer of acrylic varnish. Choose a varnish that is specifically designed for acrylic paintings. Apply the varnish evenly using a soft brush, following the manufacturer’s instructions. Let the varnish dry completely before displaying or storing the painting. Sealing your work ensures longevity when you paint bricks on canvas with acrylics. [See also: Acrylic Painting Techniques for Beginners]
Conclusion
Painting bricks on canvas with acrylics is a rewarding and creative process. By following these steps and experimenting with different techniques, you can create a stunning piece of art that captures the beauty and texture of brickwork. Remember to take your time, be patient, and enjoy the process. With practice, you’ll develop your own unique style and create beautiful brick paintings that you can be proud of. Now that you understand how to paint bricks on canvas with acrylics, you’re ready to begin your masterpiece. Remember to consider all steps to ensure a great piece of art.

