Mastering the Art: How to Paint Hills in Acrylic for Stunning Landscapes
Painting landscapes, especially those featuring rolling hills, can be a deeply rewarding artistic endeavor. Acrylic paints offer a versatile medium for capturing the subtle nuances of light, shadow, and texture that define these natural formations. This guide provides a comprehensive overview of how to paint hills in acrylic, from initial preparation to final detailing, ensuring your landscape paintings possess depth, realism, and visual appeal.
Understanding the Fundamentals of Landscape Painting
Before diving into the specifics of how to paint hills in acrylic, it’s crucial to grasp the foundational principles of landscape painting. These include composition, perspective, color theory, and value.
Composition: Arranging Elements for Visual Harmony
Composition refers to the arrangement of elements within your painting. A well-composed landscape guides the viewer’s eye through the scene, creating a sense of balance and visual interest. Consider the rule of thirds, leading lines, and the placement of your focal point. The hills themselves can act as leading lines, drawing the viewer’s attention deeper into the landscape. Avoid placing the horizon line directly in the center; instead, position it slightly above or below the midpoint to create a more dynamic composition.
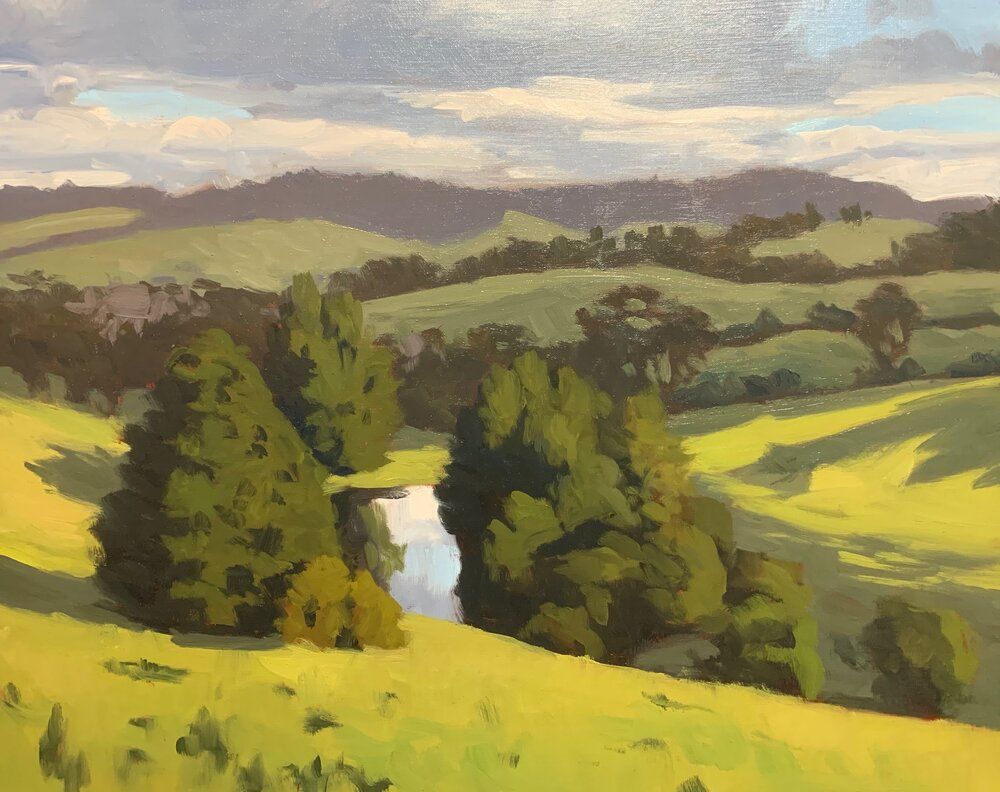
Perspective: Creating Depth and Distance
Perspective is vital for conveying depth and distance in your landscape painting. Linear perspective, aerial perspective (also known as atmospheric perspective), and overlapping are all important techniques. Linear perspective uses converging lines to create the illusion of depth, while aerial perspective uses variations in color and value to simulate the effect of distance. Hills further away should appear lighter and less saturated than those in the foreground. Overlapping objects also help to establish spatial relationships, with closer objects partially obscuring those behind them.
Color Theory: Selecting and Mixing Hues
A solid understanding of color theory is essential for any painter. Consider the color wheel, complementary colors, analogous colors, and color temperature. When painting hills, pay attention to how light affects color. Warm colors (reds, oranges, yellows) tend to advance, while cool colors (blues, greens, purples) recede. Use these principles to create depth and dimension in your hills. For example, use warmer greens and browns in the foreground hills and cooler, bluer greens in the distant hills.
Value: The Foundation of Form and Light
Value refers to the lightness or darkness of a color. It’s the foundation of form and light in your painting. Use a full range of values to create contrast and dimension. Observe how light and shadow interact with the hills, and translate these observations into your painting. Darker values suggest shadow and form, while lighter values indicate highlights and areas illuminated by light. Mastering value is key to creating realistic and believable hills.
Materials You’ll Need to Paint Hills in Acrylic
Before you start how to paint hills in acrylic, gather the necessary materials:
- Acrylic Paints: A variety of greens, browns, blues, yellows, and whites. Consider also having a few earth tones like Burnt Umber and Raw Sienna.
- Canvas or Painting Surface: Choose a canvas or painting panel of your desired size.
- Brushes: A selection of brushes in various sizes and shapes, including flat brushes, round brushes, and filbert brushes.
- Palette: A palette for mixing your paints. A disposable palette or a wet palette can be helpful.
- Water Container: For cleaning your brushes.
- Palette Knife: For mixing paints and applying texture.
- Easel: To hold your canvas at a comfortable angle.
- Mediums (Optional): Acrylic mediums can be used to alter the properties of your paints, such as drying time or consistency.
- Reference Photo (Optional): A reference photo can be helpful, especially for beginners.
Step-by-Step Guide: Painting Hills in Acrylic
Now, let’s delve into the process of how to paint hills in acrylic step by step:
Step 1: Sketching the Composition
Begin by sketching the basic shapes of the hills onto your canvas with a light pencil. Focus on the overall composition and the placement of the horizon line. Keep the sketch simple and loose. This is just a guideline to help you with the painting process. Don’t press too hard with the pencil, as you don’t want the lines to be visible in the final painting.
Step 2: Establishing the Underpainting
The underpainting is a thin layer of paint that serves as a foundation for subsequent layers. Use a diluted wash of a neutral color, such as Burnt Sienna or Raw Umber, to cover the entire canvas. This helps to create a unified base and allows you to establish the basic values of your painting. Let the underpainting dry completely before proceeding.
Step 3: Blocking in the Basic Shapes and Colors
Using a larger brush, begin blocking in the basic shapes and colors of the hills. Focus on the overall value structure and the general color scheme. Don’t worry about details at this stage. Use broad, simple strokes to establish the main forms. Remember to consider the effects of light and shadow. The hills facing the light source should be lighter, while those in shadow should be darker.
Step 4: Layering and Blending
Once the basic shapes and colors are in place, begin layering and blending your paints to create smoother transitions and more realistic textures. Use smaller brushes to add details and refine the forms of the hills. Pay attention to the way light interacts with the landscape, and use variations in color and value to create depth and dimension. Blending can be achieved by using a clean, damp brush to soften the edges of your brushstrokes. [See also: Acrylic Blending Techniques]
Step 5: Adding Details and Texture
Now it’s time to add details and texture to your hills. Use a variety of brushstrokes to create different textures, such as the rough texture of grass or the smooth texture of rocks. A palette knife can also be used to apply thick layers of paint for impasto effects. Consider adding details such as trees, bushes, or rocks to enhance the realism of your hills. Varying the direction and pressure of your brushstrokes can add visual interest. Think about adding small details that will make your how to paint hills in acrylic stand out. These could be small wildflowers, a bird in flight, or a fence line.
Step 6: Refining the Atmospheric Perspective
Refine the atmospheric perspective by adjusting the colors and values of the distant hills. Remember that hills further away should appear lighter, less saturated, and cooler in color than those in the foreground. Use thin washes of blue or purple to create a hazy effect in the distance. This will help to enhance the sense of depth in your painting.
Step 7: Adding Highlights and Shadows
Add highlights and shadows to create contrast and dimension in your hills. Use lighter values to indicate areas illuminated by light, and darker values to indicate areas in shadow. Pay attention to the direction of the light source and how it affects the form of the hills. Highlights and shadows are essential for creating a sense of realism and depth. Don’t be afraid to use bold contrasts to create drama and visual impact.
Step 8: Final Touches and Adjustments
Step back from your painting and assess it critically. Make any necessary adjustments to the composition, colors, values, or details. Look for areas that need more contrast, more detail, or more blending. Consider adding any final touches that will enhance the overall impact of your painting. Once you are satisfied with the results, allow the paint to dry completely. Consider adding a varnish to protect the paint and enhance the colors. Understanding how to paint hills in acrylic is a skill that develops over time with practice and patience.
Tips for Painting Realistic Hills in Acrylic
- Observe Carefully: Spend time observing real hills and landscapes. Pay attention to the way light and shadow interact with the terrain, the colors of the vegetation, and the textures of the rocks and soil.
- Use Reference Photos: Reference photos can be a valuable tool for capturing details and proportions. However, don’t simply copy the photo; use it as a guide to create your own interpretation of the landscape.
- Mix Your Own Colors: Avoid using colors straight from the tube. Mix your own colors to create more nuanced and realistic hues. Experiment with different combinations of colors to achieve the desired effect.
- Practice Regularly: The more you paint, the better you will become. Set aside time each day or week to practice your painting skills. Experiment with different techniques and styles to find what works best for you.
- Don’t Be Afraid to Experiment: Painting is a creative process. Don’t be afraid to experiment with different techniques and approaches. Try new things and see what happens. You may be surprised at the results.
Common Mistakes to Avoid When Painting Hills
- Lack of Value Contrast: Not using enough contrast between light and shadow can make the hills look flat and lifeless.
- Overly Saturated Colors: Using overly saturated colors can make the hills look unrealistic. Tone down the colors by mixing them with a neutral color, such as gray or brown.
- Ignoring Atmospheric Perspective: Failing to account for atmospheric perspective can make the hills look flat and unrealistic. Remember to lighten and desaturate the colors of the distant hills.
- Lack of Detail: Not adding enough detail can make the hills look generic and uninteresting. Add details such as trees, bushes, rocks, and shadows to create visual interest.
- Overworking the Painting: Overworking the painting can make it look stiff and unnatural. Know when to stop and avoid adding too much detail.
Conclusion: Embrace the Process of Learning How to Paint Hills in Acrylic
Learning how to paint hills in acrylic is a journey that requires patience, practice, and a keen eye for observation. By understanding the fundamentals of landscape painting, gathering the right materials, and following a step-by-step approach, you can create stunning landscape paintings that capture the beauty and majesty of nature. Remember to observe carefully, experiment with different techniques, and don’t be afraid to make mistakes. With practice, you will develop your own unique style and create paintings that you are proud of. The key takeaway is that mastering how to paint hills in acrylic is a continuous learning process, and the more you practice, the better you’ll become at capturing the beauty of rolling hills and landscapes on canvas. The techniques discussed will provide a solid foundation for creating beautiful and realistic hill paintings. So grab your brushes, acrylics, and canvas, and start painting!

