DIY Craftsman Style Fence: A Comprehensive Guide to Building Your Own
Craftsman style, with its emphasis on simplicity, functionality, and natural materials, has experienced a resurgence in popularity. This design philosophy extends beyond the home’s interior and architecture to outdoor spaces, including fencing. Building a DIY craftsman style fence offers homeowners a chance to enhance their property’s curb appeal, create a defined boundary, and add a touch of timeless elegance, all while saving money on professional installation. This comprehensive guide will walk you through the process, from planning and material selection to construction and finishing touches.
Why Choose a Craftsman Style Fence?
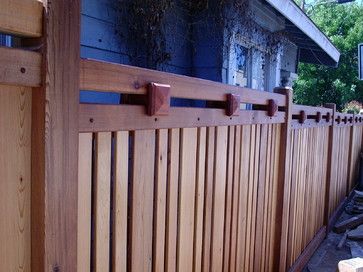
Before diving into the how-to, let’s explore why a DIY craftsman style fence is an excellent choice for your property. The craftsman aesthetic is characterized by clean lines, sturdy construction, and the use of natural materials like wood and stone. These fences often feature exposed joinery, simple post caps, and a focus on horizontal elements. They complement a wide range of architectural styles, from traditional bungalows to modern farmhouses.
- Aesthetic Appeal: Craftsman fences offer a timeless and sophisticated look that enhances curb appeal.
- Durability: Built properly, a DIY craftsman style fence can last for decades.
- Customization: You have complete control over the design, materials, and finish.
- Cost Savings: Doing it yourself significantly reduces labor costs.
- Personal Satisfaction: There’s immense satisfaction in building something with your own hands.
Planning Your Craftsman Fence Project
Careful planning is crucial for a successful DIY craftsman style fence project. This stage involves defining your needs, measuring your property, and creating a detailed design.
Define Your Needs and Objectives
Consider the primary purpose of your fence. Is it for privacy, security, pet containment, or simply aesthetic appeal? Your objectives will influence the fence’s height, style, and materials.
Measure Your Property Line
Accurate measurements are essential. Use a measuring tape and stakes to mark your property line. Be aware of any easements or setbacks that may restrict fence placement. Consult your local municipality for regulations and permit requirements. Failing to do so could result in fines or the need to remove the fence.
Design Your Fence
Sketch out your fence design, including the height, spacing between pickets, and post placement. Consider the overall style of your home and neighborhood. Research different craftsman fence designs for inspiration. Common elements include horizontal rails, sturdy posts, and simple post caps. Think about gate placement and width as well. A well-designed gate is both functional and aesthetically pleasing. [See also: Designing the Perfect Garden Gate]
Material Selection
Choosing the right materials is critical for the longevity and appearance of your DIY craftsman style fence. Common materials include:
- Wood: Cedar, redwood, and pressure-treated pine are popular choices. Cedar and redwood are naturally resistant to rot and insects, while pressure-treated pine is more affordable but requires regular maintenance.
- Fasteners: Use galvanized or stainless steel screws and nails to prevent rust and corrosion.
- Concrete: Needed for setting the posts in the ground.
Consider the cost, durability, and aesthetic appeal of each material when making your selection. Also, factor in the climate in your area. For example, if you live in an area with high humidity, you’ll want to choose a wood that is naturally resistant to rot.
Tools and Materials List
Before you start building your DIY craftsman style fence, gather all the necessary tools and materials. This will save you time and frustration during the construction process.
Tools
- Measuring tape
- Level
- Post hole digger or auger
- Circular saw
- Drill/driver
- Hammer
- Miter saw (optional)
- Safety glasses
- Gloves
- Shovels
- Wheelbarrow (for mixing concrete)
Materials (Example for a 100-foot fence)
- 4×4 posts (11, spaced 10 feet apart)
- 2×4 rails (sufficient length for 3 horizontal rails)
- 1×6 pickets (sufficient quantity for desired spacing)
- Post caps (11)
- Concrete mix (sufficient quantity for post holes)
- Fasteners (screws, nails)
- Gravel (for drainage in post holes)
- Wood stain or paint (optional)
Adjust the quantities based on your specific fence design and length. It’s always a good idea to purchase a little extra material to account for waste and mistakes.
Step-by-Step Construction Guide
Now that you have your plan, materials, and tools, it’s time to start building your DIY craftsman style fence. Follow these steps for a successful construction process:
Step 1: Setting the Posts
The posts are the foundation of your fence, so it’s crucial to set them properly. Dig post holes that are at least 2 feet deep (or deeper, depending on your local frost line) and 8 inches in diameter. Place a few inches of gravel at the bottom of each hole for drainage. Position the post in the center of the hole and pour concrete around it, ensuring it’s plumb (perfectly vertical). Use a level to check the post’s alignment and brace it in place until the concrete sets. Allow the concrete to cure for at least 24 hours before proceeding.
Step 2: Attaching the Rails
Once the posts are set, attach the horizontal rails. These rails provide structural support and serve as the attachment point for the pickets. Use screws to attach the rails to the posts, ensuring they are level and evenly spaced. Typically, three rails are used for a standard height fence: one at the top, one at the bottom, and one in the middle. Consider using a miter saw for clean, precise cuts on the rail ends.
Step 3: Installing the Pickets
Now, install the pickets. Start by determining the desired spacing between the pickets. Use a spacer block to ensure consistent spacing. Attach the pickets to the rails using screws or nails. Make sure the pickets are plumb and aligned with each other. You can choose to leave the pickets square at the top or create a decorative design by cutting them at an angle or with a curved pattern.
Step 4: Adding Post Caps
Post caps add a finishing touch to your DIY craftsman style fence and protect the post tops from the elements. Choose post caps that complement the overall style of your fence. Attach them using construction adhesive or screws.
Step 5: Finishing Touches
Once the fence is built, it’s time to add the finishing touches. Sand any rough edges or splinters. Apply a stain or paint to protect the wood and enhance its appearance. Consider adding decorative elements, such as climbing plants or lighting, to further personalize your fence. Regular maintenance, such as cleaning and reapplying stain or paint, will help to extend the life of your fence. [See also: Extending the Life of Your Wooden Fence]
Tips for a Successful DIY Craftsman Style Fence Project
- Obtain necessary permits: Check with your local municipality for fence regulations and permit requirements.
- Call before you dig: Contact your local utility companies to mark underground lines before digging post holes.
- Use quality materials: Investing in quality materials will ensure the longevity of your fence.
- Take your time: Don’t rush the construction process. Careful planning and execution will result in a better finished product.
- Enlist help: Building a fence is a labor-intensive project. Enlist the help of a friend or family member to make the job easier.
Maintaining Your Craftsman Fence
Regular maintenance is key to keeping your DIY craftsman style fence looking its best and lasting for years to come. Here are a few tips:
- Clean your fence regularly: Use a garden hose or pressure washer to remove dirt, debris, and mildew.
- Inspect your fence for damage: Check for loose pickets, rotting wood, and other signs of damage. Repair any damage promptly to prevent it from worsening.
- Reapply stain or paint: Reapply stain or paint every few years to protect the wood from the elements and maintain its appearance.
- Trim vegetation: Keep vegetation trimmed away from your fence to prevent it from damaging the wood.
Conclusion
Building a DIY craftsman style fence is a rewarding project that can enhance your property’s beauty and value. By following these steps and tips, you can create a fence that is both functional and aesthetically pleasing. Remember to plan carefully, use quality materials, and take your time. With a little effort, you can build a craftsman fence that you’ll be proud of for years to come. The charm and durability of a well-constructed DIY craftsman style fence are undeniable, making it a worthwhile investment for any homeowner. So, gather your tools, prepare your materials, and get ready to transform your outdoor space with a beautiful and functional craftsman fence.

